(Added path for Linux) Tag: Visual edit |
|||
| Line 34: | Line 34: | ||
(Mac) |
(Mac) |
||
| + | (Linux)~/.local/share/Steam/steamapps/common/Kubifaktorium/Kubifaktorium-Linux_Data/StreamingAssets |
||
| − | (Linux) |
||
Here you will find a folder named "'''Mods'''". Locate the mod folder "'''kubi.example.greentomato'''" and here you can copy the "'''Modinfo.xml'''" file and paste it into your personal mod folder. Once Complete your mod folder should now look like this :- |
Here you will find a folder named "'''Mods'''". Locate the mod folder "'''kubi.example.greentomato'''" and here you can copy the "'''Modinfo.xml'''" file and paste it into your personal mod folder. Once Complete your mod folder should now look like this :- |
||
Revision as of 18:34, 12 May 2020
Kubifaktorium has been modifiable since Tuesday, 10 September 2019 with full Steam Workshop support. With a variety of possible mods to add to the game you can add new enemies, animals, items, workshops and much more.
Take a look at this introductory video to get you started.
File Structure
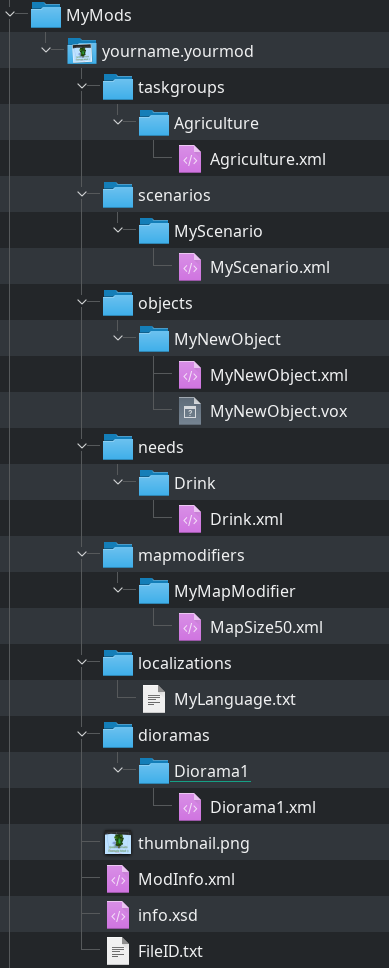
The files in your mod need to follow a specific structure as seen in the screenshot. The file "FileID.txt" is automatically generated when you upload the mod to steam, this file is a personal reference number to link you and the steam workshop changing or removal of this file will not allow you to update your mod and will require you to re post your mod as if it was new on the workshop.
DO NOT EDIT OR DELETE THIS FILE!
My First Mod
Here is a guide to creating your first mod folder and mod, here you can learn to create a tomato plant that can be grown on a farmland patch and harvested into tomatoes, that can then be consumed by colonists to fulfil their food needs.
Create The Mod Folder
First You need to create a folder called "MyMods" inside the main directory, found here:
(Windows)C:\Users\<YourName>\AppData\LocalLow\MirkoStudio\Kubifaktorium\
(Mac)~/Library/Application Support/unity.Unity Technologies.Unity Labs/
(Linux)~/.config/unity3d/MirkoStudio/Kubifaktorium/
Creating The Mod Structure
Create a folder here named :-
<YourName>.<ModName> - eg - Screech.TomatoPlant
*This is your main mod folder, remember what you type for the mod name (it is case sensitive throughout the mod)*
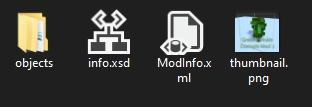
Inside this folder you can actually have just 2 files to create the mod, but we are adding 4 for this tutorial, create a blank folder called "objects" and also add a random image file and name it "thumbnail.png". The 2 other files named "info.xsd" and "Modinfo.xml" we will copy and paste from the game directory. "info.xsd" is found in the kubifaktorium folder located 1 folder back from the "MyMods" folder. To find the "Modinfo.xml" file we need to go to a different location :-
(Windows)K:\Program Files(x86)\Steam\steamapps\common\Kubifaktorium\Kubifaktorium-Windows64_Data\StreamingAssets
(Mac)
(Linux)~/.local/share/Steam/steamapps/common/Kubifaktorium/Kubifaktorium-Linux_Data/StreamingAssets
Here you will find a folder named "Mods". Locate the mod folder "kubi.example.greentomato" and here you can copy the "Modinfo.xml" file and paste it into your personal mod folder. Once Complete your mod folder should now look like this :-
Adding/Creating The First Object
For this tutorial In order to create a new object in game it is best to copy an existing object from the game and edit this object to your mod needs, Here we will go to the "StreamingAssets" Folder, which is the folder you found the "MyMods" and "info.xsd" files. Located here is a folder called "ObjectType" inside this folder is all the vanilla objects in the game. Feel free to have a browse and explore but for tutorial purposes we will go to the folder "farming". Here we will find a folder named "Tomato" Copy this folder and paste it inside your folder named "objects" in your personal mod.
Showing The Mod In Game Menus
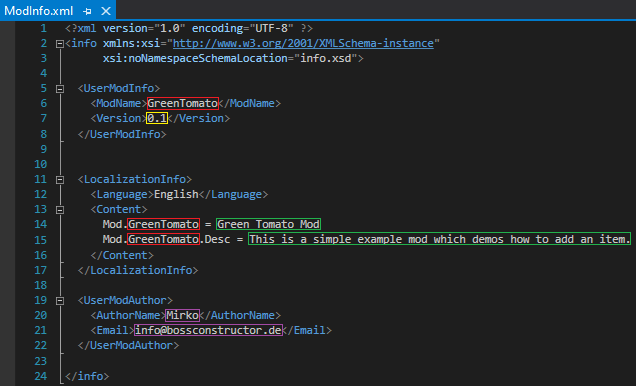
With the folder structure complete and everything in place, next you need the game to read the mod file, to do this we need to open the file "ModInfo.xml". This file will already be completed as we copied it from another mod. We need to change a few things to make it match your mod, so the game can recognise the mod and load it in on startup. below is a picture of the ModInfo.xml file with a breakdown of information:-
(You can Get the latest Version of Visual Studio Here)
---With This Complete Your Mod Will Now Show In The Mod Menus In Game---
---------------------------UNDER CONSTRUCTION----------------------------------
Editing the VOX files
For editing voxel models I recommend MagicaVoxel 0.98.2 which you can download here. The newer versions do no longer support animations, so I recommend using this older version.
- Important: When making an animation, all frames need to have the same size setting, otherwise the game cannot import them correctly.
- The first frames of your voxel animation are the build frames, i.e. the different stages during construction. The frames after are the frames used for the animation when it is built or producing.
Editing the XML files
You can edit the object’s properties by editing the xml-file in a text editor. The documentation for what each field does can be found in the ModdingAPI.html file in the StreamingAssets-folder. In general, adding Info-blocks adds a new kind of behaviour or property to an object. For example, adding a MiningInfo allows your colonists to harvest it.
Some general remarks:
- Boolean values can be specified as 0 (false) or 1 (true)
- String[] values can be given as a comma separated list
- Colors can be given via hex code, e.g. #8EE45C
- Factions can be Player, Neutral or Enemy
- NumRange is a range of ints, e.g. 5:8
- Recipes have the format Input=Output=Time, e.g. 2*Log=WoodenBoard=16
This is a first draft so things can be unclear or incomplete. If some information is missing, please contact me on Discord (https://discord.gg/kubifaktorium) and I’ll add it!
Creating localizations (translations)
In order to create a new localization, do the following:
- 1) To get started, navigate to the game's directory. There should be a folder StreamingAssets/Mods/kubi.example.localization.
- 2) Make a copy of this folder and give it a new name, e.g. "yourname.language.localization".
- 3) Open the ModInfo.xml in the folder, enter the mod name and description and your name (if you like).
- 4) (Rename and) open the file in the localizations folder. Change the language (e.g. language=Français) and locales (e.g. locales=FR) and save the file.
- 5) When starting the game, the new language should be available in the settings.
- 6) Also in the game settings, please enable "Localization Help". Whenever you start the game with a new translation file, it will now automatically create a list of the missing translation lines as well as other problems like duplicates. This is both useful to get started and to keep the translation up-to-date when new strings get added. The file can be found in C:\Users\<username>\AppData\LocalLow\MirkoStudio\Kubifaktorium\Missing_<language>.txt on Windows or ~/.config/unity3d/MirkoStudio/Kubifaktorium/ on Linux.
- The general format of the localization file for each line is <key> = <value>, for example "UI.BuildTrain = Build train". The <key> must not be changed, the <value> is to be translated, so e.g. "UI.BuildTrain = Baue Zug".
- There is a file named StreamingAssets/LocalizationHelp.txt which contains a cheat sheet giving you an idea where a string is used in the game based on it's naming pattern.
- A line starting with "#" is ignored and can be used for comments
- The line "fallback=English" specifies which language to use when a certain string cannot be found. Usually English is a good choice as it is usually the most up-to-date but other languages can be chosen if they are closer to the target language.
- The game supports hyphenation for languages with long strings like German. To use it, use the "_" character to insert a soft hyphen at the spots where a word can be hyphenated. I recommend this for words longer than 12-15 characters. For example: "Recommen_dations" or "trans_portation.
- A string in the format "#<id>#" causes an icon to be inserted, e.g. "#sun#". Note that the id must not be translated, otherwise it will not be found and translated correctly.
- A string in the format "##<id>" creates a keyword. Keywords like "##daytime" will be translated to an underlined word "daytime". In addition, an explanation will be added underneath, usually in the tooltips. Again, the id must not be translated. However, the explanation text (the lines with keys like ##idle), should.
- Strings like "$1", "$2" etc are placeholders for numbers and other things which will be filled by the game. For example "Growth rate at daytime: $1%" will become "Growth rate at daytime: 75%" at runtime.
- If required for some reason, you can use <br> to create a line break. However I recommend not using it.
- Thank you for your help!! :) In order to prevent duplicate work, it might make sense to post in the Discord channel to maybe find someone to help out.
Creating map modifiers
Map modifiers influence the procedural map generation process. You can use these to make custom spawn groups and add new terrain types. For more info on each, have a look at the ModdingAPI.html file.
- If you want to spawn something, e.g. an enemy camp, use CustomSpawnInfo*
- If you want to add a new terrain/biome, use TerrainInfo and ShaderInfo.
- If you want to alter an existing terrain, e.g. add more mountains, use TerrainModifierInfo.
- To set the map size, use MapSizeInfo.
- Use ModifierInfo to specify how your modifier can be used and how it is shown in the custom map setup screen.